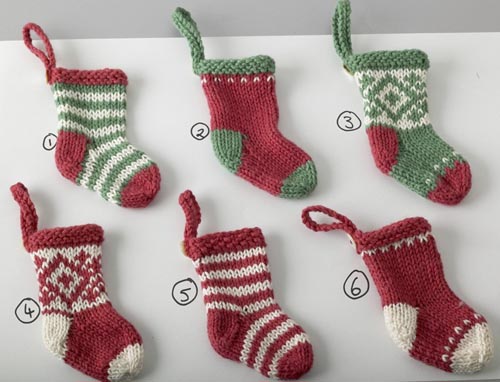
« Back to free mini christmas stocking pattern
Stocking pattern

Please watch this space as I'll be adding new step-by-step photos shortly (in focus ones!).
You can also find this pattern in a better format along with more of my free patterns here:
http://littlecottonrabbits.typepad.co.uk/free_knitting_patterns/mini_knitted_christmas_stockings/
I knit this stocking flat A) because I don't enjoy knitting in the round and B) because I think it gives greater flexibility in working fairisle and other intarsia designs. I tend to work it on double pointed needles because during heel shaping you need to switch from working one side to the other. You can knit it on regular needles but slide the work across onto a second needle at appropriate time. Apart from the stocking top it is worked in stocking stitch (knit on right side and purl on reverse)
Materials:
oddments of yarn. I prefer to knit these on 2.75 mm needles with pure cotton 4ply but the pattern will knit up with whatever you prefer. Note, obviously the larger the needle size and thicker the yarn, the larger the finished stocking. Before you start, decide which colour you are going to knit the heel in and cut a length at least 110cm (44”) keep to one side for second heel shaping*.
PATTERN:
Cast on 25 sts, **(27 if knitting a fairisle design)
knit 3 rows
row 4: (right side) begin pattern (if required)
work a total of 14 rows of pattern
**if working in fairisle design: on last wrong side row of pattern decrease 1 stitch at either end to give 25 stitches
Heel shaping:
I like to use different coloured yarn to accentuate heel. The heel is worked in 2 halves.
row 18: with right side facing, k7 and turn leaving remaining stitches on needle
row 19: slip 1, p6
repeat these 2 rows 3 more times until 8 rows of heel have been worked
row 26: k3, k2tog through the back, k1, turn leaving 1 remaining stich of heel on needle (see photo step 1 in gallery)
row 27: slip 1, p4
row 28: k2, k2tog through the back, turn leaving remaining 2 stiches on needle
row 29: slip 1, p2
row 30: k2, k2tog through the back, k1, turn
row 31: slip 1, p3
leaving these 4 stitches on needle with the main part of the stocking, slide all the work along needle, turn with wrong side facing and resume working the other side of the heel (see photo step 2 in gallery).
reverse row 18: with wrong side facing and using 110cm length of yarn cut earlier*, p7 and turn leaving remaining stitches on needle
reverse row 19: slip 1, k6
repeat these 2 rows 3 more times until 8 rows of heel have been worked
reverse row 26: p3, p2tog, p1, turn leaving 1 remaining stich of heel on needle
reverse row 27: slip 1, k4
reverse row 28: p2, p2tog, turn leaving remaining 2 stiches on needle
reverse row 29: slip 1, k2
reverse row 30: p2, p2tog, p1, turn
reverse row 31: slip 1, k3
row 32: with right side facing rejoin main colour and begin knitting across first 4 stitches of heel shaping, pick up 5 stitches from inside edge of heel (see photo step 3 in gallery), knit 11 stitches across main part of stocking, pick up 5 stitches from inside edge of 2nd heel half and knit final 4 stitches (29 stitches on needle) (see photo step 4 in gallery)
row 33: purl
row 34: K8, k2tog, k9, k2tog through the back, k8
row 35: p7, p2tog through the back, p9, p2tog, p7
row 36: K6, k2tog, k9, k2tog through the back, k6 (23 stitches)
row 37: purl
work 8 rows
row 46: with right side facing change colour for toe cap (see photo step 5 in gallery) and work 2 rows
row 48: K3, K2tog through the back, k4, k2tog, k1, k2tog through the back, k4, k2tog, k3
row 49: purl
row 50: K3, K2tog through the back, k2, k2tog, k1, k2tog through the back, k2, k2tog, k3 (15 stitches) (see photo step 6 in gallery)
row 51: purl
Cut work from the ball leaving a long end for sewing up. Thread end through 15 stitches on needle (see photo step 7 in gallery) and pull up tight. Join seam running up bottom and back of stocking using mattress stitch (see photo step 8 in gallery). Turn inside out and tie up all ends securely and trim - no need to sew them in. Turn right side out.
Hanging loop: cast on 35 stitches and then cast them off. Double strip over to make a loop and sew to back of stocking. Secure with a cute button.
COPYRIGHT:
This pattern is an original design. You are welcome to knit up for personal use but please don't use it for commercial purposes.
Any problems or comments please email me.