Teeny tiny knitted toys
May 01, 2008
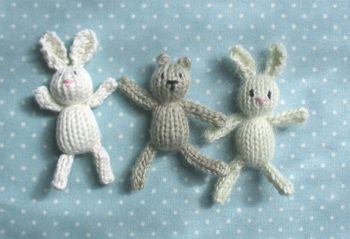
Here is a free pattern to make some teeny tiny toys - just under 2.5 inches (6 cms) tall.
It's a wee bit fiddly but lots of fun!
What you will need:
some left-over scraps of 4ply yarn in pink, black and fur colour (brown/ cream / grey...) a small circle of felt (for the back of the face - to prevent the tiny stitches pulling through), 1 pair of 2.25mm needles and 2 double pointed 2.25mm needles.
You can use thicker yarn and larger needles for a larger sized toy, eg:
3mm needles with DK yarn
3.25mm needles with aran yarn
With your fur colour yarn and 2.25mm needles cast on 13 stitches - leaving a tail of around 5 inches for sewing up later.
Purl the first row and knit the next. Continue in stocking stitch until work measures 1.5 inches (4cms), approx 18 rows in total.
Cut the work from the ball of yarn leaving around 6 inches for sewing up and thread a needle with this end. Thread the cast off end through the stitches on the needle.
Now take your small circle of felt and place at the back of the work behind where you plan to embroider the face. Using the pink yarn embroider a small nose in centre of face - I use 1 stitch across and 1 small stitch downwards. Knot the yarn at the back of the work and trim ends off. Now add the eyes with the black yarn - you can tie a small knot in the thread to make the eye stand out. Again knot the thread at the back of the work and tie ends securely trimming off excess.
Place a small ball of stuffing behind face and join the back seam of the body using mattress stitch (follow link & scroll down). Tie a length of yarn tightly around the body around half way up to give your toy a neck and thread ends through the body before trimming off excess (if you prefer a neater finish to the neck see an alternative method here). Stuff the body cavity. Thread a needle with the cast on tail and use this to catch up the loops around the bottom of the body.
Pull up tightly to gather seam and seal body cavity. Tie off tightly and thread ends through the body before trimming off excess.
Now make the limbs (4 the same). Cast on 4 stitches with the double pointed needles and knit a short i-cord - around 6 - 8 rows in length. Cut the work from the ball and thread end through the stitches on the needles and then through the middle of the work - knotting it securely to the cast on tail.
For rabbit ears cast on 5 stitches.
K1, P1, K1, P1, K1 - repeat this row 5 times more to give 6 rows from cast on.
7th row: K1, P3 together, K1
8th row: K1, P1, K1
9th row: K1, K2 together, pass 1st stitch over.
Cut the work from ball of yarn and thread the end through the last stitch to cast off. Using the cast off tail thread this through the centre of the ear and tie to cast on tail.
(To make ears for a bear cast on 3 stitches, knit 1 row, cast off 3. Tie cast on and cast off ends together tightly and sew in place.)
Assemble all of the body parts.
Join the ears to the top of the head with a few stitches. Knot ends securely together and thread through the body before trimming excess.
Repeat with all of the limbs. And there you have an itty, bitty bunny!
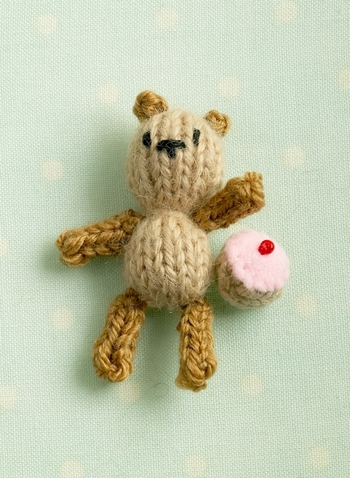
And if you fancy you could make your teeny tiny toy a little snack:
Teeny iced bun:
using a bun-coloured wool (preferably 4ply / fingering weight) and US 0 / 2.0 mm needles cast on 3 stitches
P3
K1, YO, K1, YO, K1
P5
K1, YO, K1, YO, K1, YO, K1, YO, K1
P 9
K 9
P 9
K2tog through the back twice, K1, K2tog twice
P 5
K2tog through the back, K1, K2tog
P 3
K1, K2tog, pass 1st stitch over, and pull end through to cast off
Tie both cast on and cast off ends together and thread a needle with one end, gathering the edges in to make a ball - stuff with a short length of same colour yarn. Tie off the ends and thread through the ball before trimming off.
Cut a small circle of felt, sew a seed bead in the centre as a cherry, tie off and trim thread ends on the back. Sew the felt circle over the sewn up end of the knitted bun.
...............................................................................................
Copyright © Julie Williams 2008.


