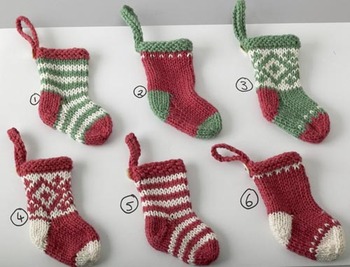
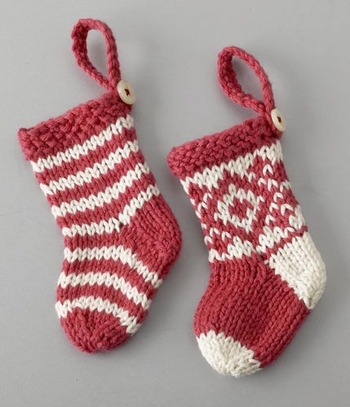
knitted mini christmas stockings
June 15, 2007
UPDATE: November 2015.
There is a brand new PDF file for this pattern that you can download for free here. Stocking Pattern Link: download now.
.........................................................................................................................
I knit this stocking flat because I don't enjoy knitting in the round and prefer working fair Isle and intarsia designs this way.
I tend to work it on double pointed needles because during heel shaping you need to switch from working one side to the other. You can knit it on regular needles but slide the work across onto a second needle at appropriate time. Apart from the stocking top it is worked in stocking stitch (knit on right side and purl on reverse)

Materials:
oddments of yarn. I prefer to knit these on 2.75 mm needles with pure cotton 4ply but the pattern will knit up with whatever you prefer. Note, obviously the larger the needle size and thicker the yarn, the larger the finished stocking. Before you start, decide which colour you are going to knit the heel in and cut a length at least 110cm (44”) keep to one side for second heel shaping*.
PATTERN:
Cast on 25 sts, **(27 if knitting one of the stranded designs charted below)
rows 1 - 3: knit
row 4: (right side) begin pattern from charts below (if required)
work a total of 14 rows of pattern ending with a wrong side row.
**if working in one of the stranded / fairisle designs: on last wrong side row of pattern chart decrease 1 stitch at either end to give 25 stitches
Start at the bottom of the chart for the pattern charts
Heel shaping:
I like to use different coloured yarn to accentuate heel. The heel is worked in 2 halves.
row 18: with right side facing, k7 and turn leaving remaining stitches on needle
row 19: slip 1, p6
repeat these 2 rows 3 more times until 8 rows of heel have been worked
row 26: k3, k2tog through the back, k1, turn leaving 1 remaining stich of heel on needle (see photo step 1)
row 27: slip 1, p4
row 28: k2, k2tog through the back, turn leaving remaining 2 stiches on needle
row 29: slip 1, p2
row 30: k2, k2tog through the back, k1, turn
row 31: slip 1, p3
leaving these 4 stitches on needle with the main part of the stocking, slide all the work along needle, turn with wrong side facing and resume working the other side of the heel (see photo step 2).
reverse row 18: with wrong side facing and using 110cm length of yarn cut earlier*, p7 and turn leaving remaining stitches on needle
reverse row 19: slip 1, k6
repeat these 2 rows 3 more times until 8 rows of heel have been worked
reverse row 26: p3, p2tog, p1, turn leaving 1 remaining stich of heel on needle
reverse row 27: slip 1, k4
reverse row 28: p2, p2tog, turn leaving remaining 2 stiches on needle
reverse row 29: slip 1, k2
reverse row 30: p2, p2tog, p1, turn
reverse row 31: slip 1, k3
row 32: with right side facing rejoin main colour and begin knitting across first 4 stitches of heel shaping, pick up 5 stitches from inside edge of heel (see photo step 3), knit 11 stitches across main part of stocking, pick up 5 stitches from inside edge of 2nd heel half and knit final 4 stitches (29 stitches on needle) (see photo step 4)
row 33: purl
row 34: K8, k2tog, k9, k2tog through the back, k8
row 35: p7, p2tog through the back, p9, p2tog, p7
row 36: K6, k2tog, k9, k2tog through the back, k6 (23 stitches)
row 37: purl
work a further 8 rows of stocking stitch (knit on right side, purl on reverse)
row 46: with right side facing change colour for toe cap (see photo step 5) and work 2 rows
row 48: K3, K2tog through the back, k4, k2tog, k1, k2tog through the back, k4, k2tog, k3
row 49: purl
row 50: K3, K2tog through the back, k2, k2tog, k1, k2tog through the back, k2, k2tog, k3 (15 stitches) (see photo step 6)
row 51: purl
Making Up:
Cut work from the ball leaving a long end for sewing up. Thread end through 15 stitches on needle (see photo step 7) and pull up tight.
Join seam running up bottom and back of stocking using mattress stitch (see photo step 8).
Turn inside out and tie up all ends securely and trim - no need to sew them in. Turn right side out.
Hanging loop: cast on 35 stitches and then cast them off. Double strip over to make a loop and sew to back of stocking. Secure with a cute button.
Copyright © Julie Williams 2005.
There are lots of ideas for adapting the design of this pattern (for instance adding numbers to make an advent calendar) over on ravelry:


This stocking pattern is fantastic! Thank you so much for posting!
Happy Christmas, Liz xx
Posted by: Lizzie | December 20, 2010 at 12:08 PM
Hi, I congratulate you on Merry Christmas!
Posted by: JOBS_frend | December 25, 2010 at 07:59 PM
With the new 2011. Year! Congratulations.
Posted by: Realestate | January 10, 2011 at 03:36 PM
Interesting site, always a new topic .. good luck in the new 2011. Happy New Year!
Posted by: Rental | January 14, 2011 at 06:35 PM
Happy New Year! Happiness and success in 2011.
Posted by: Rental | January 19, 2011 at 03:39 PM
Thanks Julie, I hope you don't mind but your holly is jsut perfect to finish off my christmas pudding for a charity christmas card competition.
Posted by: cat | March 02, 2011 at 12:16 AM
I made these on for 4mm needles. They are really addictive! I am on number 3.
Posted by: Slade Baron | May 20, 2011 at 11:47 PM
Your website and blog is the most beautiful one on the web
Posted by: Rita | September 01, 2011 at 06:59 PM
Thank you so much for this--I don't think I could have done such a small project knitting in the round on double-pointed needles...this will work out much prettier for a newish knitter like me :)
Posted by: Ginny | October 27, 2011 at 02:27 AM
I have made a few of these now for our
Christmas Tree - the first one I did - not good - but has made an excellent holder for
my mobile phone (done with thick wool on No.8 needles!) Now my daughter in law has
seen them and asked if her 3-month old can have a couple of pairs for the winter, so I am about to play about with making a pair big enough for her! Very successful.
Thank you. ANN , WEST SUSSEX
Posted by: ANN LEFLEY | October 31, 2011 at 11:18 AM
Just knitted my first ever sock! Thanks!!
Posted by: Alison | November 17, 2011 at 02:31 AM
dang! i need some more knitting yarn!(and im only 11!) im pretty good though! ^-^
Posted by: Elissa | November 18, 2011 at 09:58 PM
this pattern is great, comes up really nicely and is well-explained...i'm only a beginner but still managed to work it out! thanks for sharing.
Posted by: Penny | November 20, 2011 at 10:11 AM
Thank you for this pattern. I have made to already. The christmas tree one looks so lovely! I am wondering - if I wanted to make a big one to put presents in, would it work to just multiply the number of pattern by 4/5 and add some more rows underneath the fairisle pattern to make the stocking longer as well as wide?? Ant ideas let me know. I haven't fond any stocking this lovely anywhere!
Posted by: Sarah | November 20, 2011 at 09:47 PM
these are SO adorable. Too bad I don't know how to knit :-(
Posted by: Heather | November 20, 2011 at 10:25 PM
such beautiful and adorable stockings! thanks a million for the tutorial.
Posted by: Linda Morgen | December 05, 2011 at 05:57 PM
Thank you for posting this amazing patterns! I especially love the Christmas Stockings.
Posted by: Rainy | December 10, 2011 at 03:10 AM
I am making your stocking ornament as a gift + putting chap-stick inside. This is a great gift for my secret Santa exchange at work. Thank you for sharing.
Marilyn
Posted by: Marilyn Clifford | December 10, 2011 at 01:15 PM
I love these little stockings. i have just knitted 8 of them as teacher gifts from my children. They have chocolates in and look fantastic. Might knit a f more to use as little tags on larger presents too. Thank you for this excellent pattern.
Posted by: JayJayEmEye | December 10, 2011 at 11:39 PM
These are beautiful Julie, thank you for the pattern. I shall really enjoy making these.
T xxx
Posted by: Tracey Todhunter | December 12, 2011 at 03:24 PM
Thank you these look perfect - I have knitted santas and angels made by someone else - now I am dying to have a go at these myself Helen Beard
Posted by: Helen Beard | January 02, 2012 at 07:05 PM
These are adorable and I'm starting now so that I can knit a couple dozen by Christmas 2012! Thank you for generously sharing your lovely designs.
Posted by: Edith Berger | January 25, 2012 at 12:13 AM
I loved using this pattern and wrote about it here: http://knittingpatternreview.blogspot.com/2012/04/little-cotton-rabbits-knitted-mini.html
Posted by: Missy | April 14, 2012 at 03:01 PM