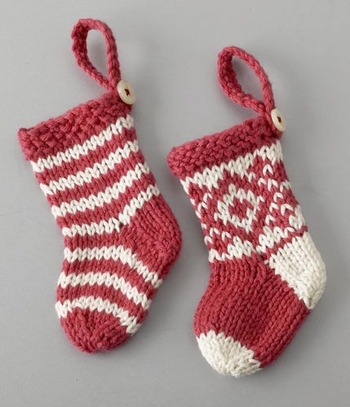
knitted mini christmas stockings

Stockings
UPDATE: November 2015.

There is a brand new PDF file for this pattern that you can download for free here. Stocking Pattern Link: download now.

.........................................................................................................................

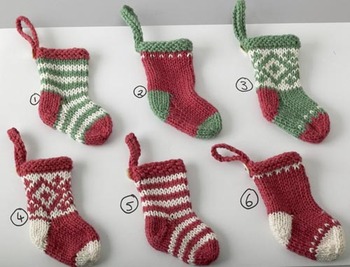
I knit this stocking flat because I don't enjoy knitting in the round and prefer working fair Isle and intarsia designs this way.


Tree_stocking

I tend to work it on double pointed needles because during heel shaping you need to switch from working one side to the other. You can knit it on regular needles but slide the work across onto a second needle at appropriate time. Apart from the stocking top it is worked in stocking stitch (knit on right side and purl on reverse)
Stockings6


Materials:
oddments of yarn. I prefer to knit these on 2.75 mm needles with pure cotton 4ply but the pattern will knit up with whatever you prefer. Note, obviously the larger the needle size and thicker the yarn, the larger the finished stocking. Before you start, decide which colour you are going to knit the heel in and cut a length at least 110cm (44”) keep to one side for second heel shaping*.

PATTERN:

Cast on 25 sts, **(27 if knitting one of the stranded designs charted below)
rows 1 - 3: knit
row 4: (right side) begin pattern from charts below (if required)
work a total of 14 rows of pattern ending with a wrong side row.
**if working in one of the stranded / fairisle designs: on last wrong side row of pattern chart decrease 1 stitch at either end to give 25 stitches


Stocking chart2


Start at the bottom of the chart for the pattern charts

Heel shaping:
I like to use different coloured yarn to accentuate heel. The heel is worked in 2 halves.
row 18: with right side facing, k7 and turn leaving remaining stitches on needle
row 19: slip 1, p6
repeat these 2 rows 3 more times until 8 rows of heel have been worked
row 26: k3, k2tog through the back, k1, turn leaving 1 remaining stich of heel on needle (see photo step 1)


Step_1

row 27: slip 1, p4
row 28: k2, k2tog through the back, turn leaving remaining 2 stiches on needle
row 29: slip 1, p2
row 30: k2, k2tog through the back, k1, turn
row 31: slip 1, p3
leaving these 4 stitches on needle with the main part of the stocking, slide all the work along needle, turn with wrong side facing and resume working the other side of the heel (see photo step 2).


Step_2

reverse row 18: with wrong side facing and using 110cm length of yarn cut earlier*, p7 and turn leaving remaining stitches on needle
reverse row 19: slip 1, k6
repeat these 2 rows 3 more times until 8 rows of heel have been worked
reverse row 26: p3, p2tog, p1, turn leaving 1 remaining stich of heel on needle
reverse row 27: slip 1, k4
reverse row 28: p2, p2tog, turn leaving remaining 2 stiches on needle
reverse row 29: slip 1, k2
reverse row 30: p2, p2tog, p1, turn
reverse row 31: slip 1, k3

row 32: with right side facing rejoin main colour and begin knitting across first 4 stitches of heel shaping, pick up 5 stitches from inside edge of heel (see photo step 3), knit 11 stitches across main part of stocking, pick up 5 stitches from inside edge of 2nd heel half and knit final 4 stitches (29 stitches on needle) (see photo step 4)


Step_3

Step_4

row 33: purl
row 34: K8, k2tog, k9, k2tog through the back, k8
row 35: p7, p2tog through the back, p9, p2tog, p7
row 36: K6, k2tog, k9, k2tog through the back, k6 (23 stitches)
row 37: purl
work a further 8 rows of stocking stitch (knit on right side, purl on reverse)
row 46: with right side facing change colour for toe cap (see photo step 5) and work 2 rows


Step_5

row 48: K3, K2tog through the back, k4, k2tog, k1, k2tog through the back, k4, k2tog, k3
row 49: purl
row 50: K3, K2tog through the back, k2, k2tog, k1, k2tog through the back, k2, k2tog, k3 (15 stitches) (see photo step 6)


Step_6

row 51: purl

Making Up:

Cut work from the ball leaving a long end for sewing up. Thread end through 15 stitches on needle (see photo step 7) and pull up tight.


Step_7

Join seam running up bottom and back of stocking using mattress stitch (see photo step 8).


Step_8

Turn inside out and tie up all ends securely and trim - no need to sew them in. Turn right side out.

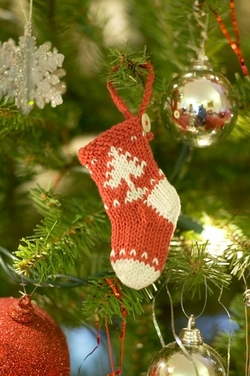
Hanging loop: cast on 35 stitches and then cast them off. Double strip over to make a loop and sew to back of stocking. Secure with a cute button.

Stockings

Copyright © Julie Williams 2005.

There are lots of ideas for adapting the design of this pattern (for instance adding numbers to make an advent calendar) over on ravelry:


itty bitty dress

This is a pattern to make a dress for a very tiny toy (see here).


Minibun

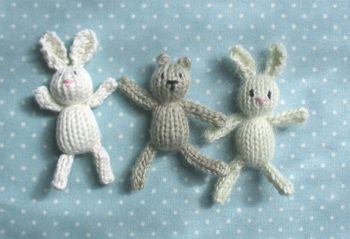
It can be made from scraps of yarn - sock yarn or 4ply is best. In order to make it fit, please use the same needle size that you used to make your mini bunny. For instance, the mini bunnies above were knitted from Debbie Bliss cashmerino aran yarn on 3.25mm needles and so I've used 3.25mm needles for the dresses.

Cast on 28 stitches, leaving a tail of around 6 inches for seaming up the back of the dress at the end.

row 1: knit

row 2: knit

row 3: knit

row 4: purl

row 5: knit

row 6: purl

row 7: knit

row 8: purl

row 9: knit 2, (k2tog) 12 times, k2 (16 stitches)

row 10: purl

row 11: knit 4, yfon, ssk, knit 4, k2tog, yfon, knit 4

row 12: purl 4, purl into back of next stitch (leaving an eyelet for the arm hole), purl 6, purl into back of next stitch (leaving another eyelet for the arm hole), purl 4 ( 16 stitches)

row 13: cast off knit wise

Cut the work from the ball leaving a tail of around 8 inches. Using a fine crochet hook (around 2mm) make a chain of 5 stitches using this tail and join it back to the start point with a slip stitch to make a small loop. Sew a tiny button on the opposite side as a fastening for the dress.

I use micro buttons like these:


Buttonjar

Weave the remainder of the cast off end along the edge to the point of the row 9 decreases and leave the end hanging for now. Re-thread the needle with the cast on edge and use it to close the seam at the back of the dress with mattress stitch. When you reach the shaping on row 9 tie both ends together and weave along the inside of the seam before trimming off excess.


And there you have a teeny tiny dress for a bunny or a bear.

Abbreviations:

K2tog: knit 2 stitches together

YFON: Yarn forward over needle - makes a stitch. Start with the working yarn at the back of the work, bring it over the top of the right hand needle to the front and back under the right hand needle again to the back so making a loop them work the next stitch as indicated in the pattern.

SSK: slip, slip, knit. Slip a stitch (as if to knit it) to the right-hand needle, slip a second stitch in the same way, slip both stitches back to the left-hand needle and knit together through the back loops.


Copyright © Julie Williams 2013.


Christmas tree bears

Christmas toys


You can download a free pdf to print out here:

Download Christmas tree bears

Materials needed: 

2.25mm needles (size 1 US, UK/Canada 13)
a pair of double pointed needles 2.25mm (size 1 US, UK/Canada 13)
oddments of 4ply yarn in red and white
oddments of bear coloured yarn (4ply or DK)
a small circle of felt to reinforce the stitching on the face
a short length of black yarn for embroidering the face
small amount of toy stuffing / carded wool
6 inch length of ribbon
a couple of lengths of strong yarn

(knitting this pattern in thicker weight yarn and larger needle sizes will give a larger decoration)


Pattern:

Cast on 20 stitches with red coloured yarn
Rows 1&2: Knit all stitches
Row 3: K2 red, (K1 white, K1 red) 9 times
Row 4: Purl all stitches in red
Rows 5-10: Continue in stocking stitch with red yarn for a further 6 rows. Cut the red yarn from work leaving a tail of 5 inches or so for seaming later.
Rows 11-18: Change to bear coloured yarn and work 8 rows of stocking stitch

Finish knitting


With a 6 inch long length of strong yarn (one that will not break) thread through the 20 stitches on  the needle slipping them off as you go (don’t yet tie off these ends). Take another 6 inch length of the strong yarn and pick up the loops from the back of the topmost row of red knitting, again leaving this loose for now.

Pickup loops


Now take your small circle of felt and place at the back of the work behind where you plan to embroider the face. Using the black yarn embroider a small nose in centre of face - I use 1 stitch across and 1 small stitch downwards. Now add the eyes (if you wish you can tie a small knot in the thread to make the eye stand out). Knot the black thread at the back of the work and tie ends securely trimming off the excess.

Finish face from backFinish face


Take the length of ribbon, double it over and tie a knot in the end to form a loop. Pull the strong yarn ends at the very top of the work to start to gather in the top of the head. Thread the ribbon through the top gathered edge of the head with the loop on the outside and the knot inside the head. Tightly pull the yarn ends gathering in the top of head and tie off securely. Begin joining the seam down the back of the head using the cast off end of bear coloured yarn.

Insert ribbon


When you reach the bottom of the head take a small piece of stuffing and use to firmly stuff the head. Then take up the second pair of strong yarn ends and pull very tightly to gather in the neck - tie off securely and leave ends inside the body. Continue seaming down the rest of the body to the cast on edge.

Join seam


Stuff the body cavity and join the seam at the bottom of the dress (I pick up the stitch loops inside the body from the back of the second row up. This gives a nice flared out edge to the bottom of the dress).

Ready for arms


Now make the limbs (4 the same). Cast on 4 stitches with the double pointed needles and knit a short i-cord (tutorial here - scroll down to find) of around 6 rows in length. Cut the work from the ball and thread the end through the stitches on the needle and then through the middle of the work - knotting it securely to the cast on tail (there are pictures for making the limbs over on my free pattern for teeny tiny toys)

To make the bear ears cast on 3 stitches, knit 1 row, cast off 3. Tie cast on and cast off ends together tightly and join to the top of the head with a few stitches. Knot ends securely together and thread through the body before trimming excess.

Take the first of the limbs and join to the body with a few stitches. Knot ends securely together and thread through the body before trimming off the excess. Repeat with the remaining limbs.
And there you have a little, itty, bitty bear Christmas decoration, all ready for hanging on the tree!

Christmas toys

If you prefer you can make the dress extra long (around 12 rows) and not bother with the legs.

Longdress


If you would like a rabbit instead of a bear please see my free pattern for teeny tiny toys for the rabbit ear instructions.

Copyright © Julie Williams 2008.


Teeny tiny knitted toys

Here is a free pattern to make some teeny tiny toys - just under 2.5 inches (6 cms) tall.

It's a wee bit fiddly but lots of fun!


Friends

What you will need:

some left-over scraps of 4ply yarn in pink, black and fur colour (brown/ cream / grey...) a small circle of felt (for the back of the face - to prevent the tiny stitches pulling through), 1 pair of 2.25mm needles and 2 double pointed 2.25mm needles.

You can use thicker yarn and larger needles for a larger sized toy, eg:

3mm needles with DK yarn

3.25mm needles with aran yarn


Materials

With your fur colour yarn and 2.25mm needles cast on 13 stitches - leaving a tail of around 5 inches for sewing up later.

Purl the first row and knit the next. Continue in stocking stitch until work measures 1.5 inches (4cms), approx 18 rows in total.


Step1

Cut the work from the ball of yarn leaving around 6 inches for sewing up and thread a needle with this end. Thread the cast off end through the stitches on the needle.


Step2

Now take your small circle of felt and place at the back of the work behind where you plan to embroider the face. Using the pink yarn embroider a small nose in centre of face - I use 1 stitch across and 1 small stitch downwards. Knot the yarn at the back of the work and trim ends off. Now add the eyes with the black yarn - you can tie a small knot in the thread to make the eye stand out. Again knot the thread at the back of the work and tie ends securely trimming off excess.


Step3

Place a small ball of stuffing behind face and join the back seam of the body using mattress stitch (follow link & scroll down). Tie a length of yarn tightly around the body around half way up to give your toy a neck and thread ends through the body before trimming off excess (if you prefer a neater finish to the neck see an alternative method here). Stuff the body cavity. Thread a needle with the cast on tail and use this to catch up the loops around the bottom of the body.


Step4

Pull up tightly to gather seam and seal body cavity. Tie off tightly and thread ends through the body before trimming off excess.

Now make the limbs (4 the same). Cast on 4 stitches with the double pointed needles and knit a short i-cord - around 6 - 8 rows in length. Cut the work from the ball and thread end through the stitches on the needles and then through the middle of the work - knotting it securely to the cast on tail.


Step5

For rabbit ears cast on 5 stitches.
K1, P1, K1, P1, K1 - repeat this row 5 times more to give 6 rows from cast on.
7th row: K1, P3 together, K1
8th row: K1, P1, K1
9th row: K1, K2 together, pass 1st stitch over.

Cut the work from ball of yarn and thread the end through the last stitch to cast off. Using the cast off tail thread this through the centre of the ear and tie to cast on tail.


Step6

(To make ears for a bear cast on 3 stitches, knit 1 row, cast off 3. Tie cast on and cast off ends together tightly and sew in place.)

Assemble all of the body parts.


Step7

Join the ears to the top of the head with a few stitches. Knot ends securely together and thread through the body before trimming excess.


Step8


Repeat with all of the limbs. And there you have an itty, bitty bunny!


Finished

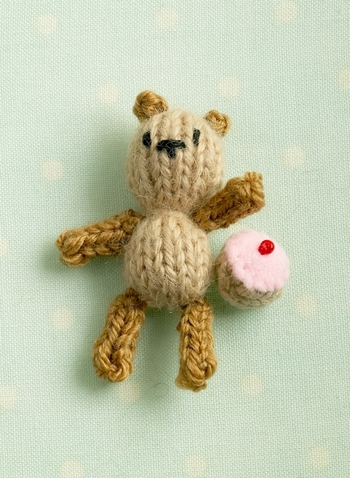
And if you fancy you could make your teeny tiny toy a little snack:


Tinies_2

Teeny iced bun:
using a bun-coloured wool (preferably 4ply / fingering weight) and US 0 / 2.0 mm needles cast on 3 stitches
P3
K1, YO, K1, YO, K1
P5
K1, YO, K1, YO, K1, YO, K1, YO, K1
P 9
K 9
P 9
K2tog through the back twice, K1, K2tog twice
P 5
K2tog through the back, K1, K2tog
P 3
K1, K2tog, pass 1st stitch over, and pull end through to cast off

Tie both cast on and cast off ends together and thread a needle with one end, gathering the edges in to make a ball - stuff with a short length of same colour yarn. Tie off the ends and thread through the ball before trimming off.

Cut a small circle of felt, sew a seed bead in the centre as a cherry, tie off and trim thread ends on the back. Sew the felt circle over the sewn up end of the knitted bun.

...............................................................................................

Copyright © Julie Williams 2008.


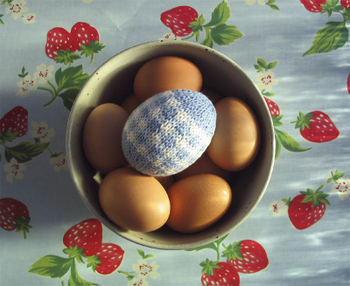
knitted easter egg decoration


Eastereggs1

As of April 1st 2019 there is a downloadable PDF file for this pattern available free from Ravelry

download now

This pattern uses oddments of  4 ply yarn (I usually work it in cotton - such as Rowan Cotton 4ply) and uses 2.75 mm needles. My tension works out to 8 stitches and 10 rows per inch.

The egg is knitted flat and then seamed using mattress stitch. You can stuff the finished egg with polyfil / wool / cotton wadding or it will fit around a polystyrene egg (see here for supplies within the UK).

Row 1: Cast on  11 stitches (leaving a length of yarn about 6 inches for sewing up later)
Row 2: Purl
Row 3: K2, (*M1, K1) 8 times, K1 (19 stitches) *M1=make one,
Row 4: Purl
Row 5: K2, (M1, K1) 16 times, K1 (35 stitches)
Row 6: Purl
Row 7: Knit
Row 8: Purl
Row 9: K3, M1, (K2, M1) 6 times, K3, M1 (K2, M1) 7 times, K3 (50 stitches)
Row 10: Purl
Row 11: Change to yarn colour for pattern band - work chosen pattern band over the next 12 rows (see charts below for pattern suggestions) or simply use a contrasting colour for middle 12 rows.

Zig zag pattern using 3 colours:


Eggzigzag_3

Polka dot pattern using 2 colours:


Eggpolkadots2_3

Stripe pattern using 2 or more colours:


Eggstripes_4

gingham pattern using 3 colours:


Egggingham_3

Or why not design your own band (50 stitches x 12 rows):


Egggraph_2

Row 23: change yarn colour and knit
Row 24: purl
Row 25: K3, K2 tog, (K2, K2tog) 11 times, K1 (38 stitches)
Row 26: purl
Row 27: K2, K2 tog, (K1, K2tog) 11 times, K1 (26 stitches)
Row 28: purl
Row 29: knit
Row 30: purl
Row 31: K1, (K2 tog) 12 times, K1 (14 stitches)
Row 32: purl
Cut the work from the yarn leaving an end around 6 inches long, thread end through stitches on needle and pull up tight. Use this end to begin sewing up the seam. Sew around 1 inch of seam and then begin seaming at other end of egg.

If you want to hang the egg as a decoration then cut a length of ribbon and tie the ends together. Thread the loop through the gathered stitches at the pointed end of the egg leaving the knotted part inside.

At the other end of the egg thread the length of yarn left by the cast on and use to catch up the 11 stitch loops and up pull tight. Continue in mattress stitch to close the seam - leaving around 2 inches of unclosed seam to stuff the egg (if using polyfil or similar). If you are fitting it around a polystyrene egg just sew around half an inch of seam at either end and close the rest of the seam with the polystyrene egg in place.

When the seams meet tie off ends and thread inside trimming off any excess ends.


Eastereggs3

Copyright © Julie Williams 2006.


knitted letter charts / alphabet


A   to Z

E_jumper_1

I designed these charts for a college typography project longer ago than I care to mention! In the past I have used the letters on jumpers for some of the toys but as I'm no longer able to take on orders I thought I'd share them. You can group them to spell out words or use them singly on projects where you want an initial.

The original charts that I designed are here: https://littlecottonrabbits.typepad.co.uk/photos/alphabet/

or

You can download an updated pdf file of the charts here: Download Alphabet

Copyright © Julie Williams 2006.


knitted holly

This is a bit fiddly but worth the effort and if you can interpret my instructions I'm sure you'll be pleased with the way that you get a distinct vein up the centre of the leaf.

Hopefully I've explained it well enough to follow - if you have any suggestions on a better description of the twisted stitch please drop me a line.

Many thanks!


Holly2_2


Holly:

Using 2.25mm needles and 4ply yarn cast on 3 stitches
Row 1: Purl
Row 2: K1, YFON, K1, YFON, K1 (5 stitches)
Row 3: P1, twist a*, YFON, P1, YFON, P2 (7 stitches)
Row 4: K2, twist b**, YFON, K1, YFON, K into back of next stitch, K2 (9 stitches)
Row 5: P3, twist a*, P5 (9 stitches)
Row 6: K2tog through the back, K5, K2tog (7 stitches)
Row 7: P2tog, p3, P2together through the back (5 stitches)
Row 8: K2, YFON, K1, YFON, K2 (7 stitches)
Row 9: P2, twist a*, YFON, P1, YFON, P3 (9 stitches)
Row 10: K3, twist b**, K1, K into back of next stitch, K3 (9 stitches)
Row 11: P2tog, P5, P2together through the back (7 stitches)
Row 12: K2tog through the back, K3, K2 tog (5 stitches)
Row 13: P2tog, P1, P2tog through the back (3 stitches)
Row 14: K1, K2 together pass first stitch over, pull end through  to cast off

Abbreviations:
YFON = Yarn forward over needle - makes an extra stitch. Start with the working yarn at the back of the work, bring it over the right hand needle to the front and back under the right hand needle again to the back so making a loop.

* twist a = insert right hand needle into the back of the made stitch purlwise, slip onto the righthand needle and slip back onto the lefthand needle so that what was the back of stitch becomes the front. Purl into back of this stitch)

** twist b = insert right hand needle into the front of the made stitch knitwise, slip onto the righthand needle and slip back onto the lefthand needle so the back of stitch becomes the front. Knit this stitch )


Holly

To make the berries:
Using 2.25mm needles and red 4ply yarn, Cast on 3

Row 1: P3
Row 2: K1, YFON, K1, YFON, K1 (5 stitches)
Row 3: P5
Row 4: K5
Row 5:P5
Row 6: K2tog through the back, K1, K2tog (3 stitches)
Row 7: Slip 1, P2 tog through the back pass slip stitch over, thread end through to cast off
Tie both cast on and cast off ends together and use one end to sew base together and make a small ball

Making up
Sew 2 leaves together at a slight angle, position desired number of berries in centre and sew in place.

Copyright © Julie Williams 2006.


knitted cupcake decoration


Cupcake

 
Materials:
a few oddments of yarn in cream, chocolate, pink and red
I use 4ply cotton yarn with 2.25mm needles (size 1 US, UK/Canada 13)
seed beads / sequins / decorations

Pattern:

Cast on 15 stitches with the cream colour for the cake case
Row 1:   (K1, P1) 7 times, K1
Row 2:   (P1, K1,) 7 times, P1
Row 3:   as row 1
Row 4:   as row 2
Row 5:   as row 1
Row 6:   as row 2
Row 7:   as row 1
Row 8:   as row 2
Row 9:   K1, (P1, wrap yarn once around needle* K1) 7 times      * to make a stitch
Row 10: (P1, Knit into the front of made stitch, K1) 7 times, P1
Row 11: (K1, P2) 7 times, K1
Row 12: cast off, keeping ribbing correct

Row 13: With chocolate cake coloured yarn pick up and knit 15 stitches from the back of the finished case (around 1 row down from the cast off edge) taking 1 alternately from the purl rib and 1 from the knit rib.
Row 14: purl a further row in cake colour
Row 15: change yarn to pink colour for the icing and knit 1 row
Row 16: knit a row
Row 17: purl a row
Row 18: knit a row
Row 19: P2tog, P 11, P2tog through the back
Row 20: K2tog through the back, K9, K2tog
Row 21: P2tog, P 7, P2tog through the back
Row 22: K2tog through the back, K5, K2tog
Row 23: P2tog, P 3, P2tog through the back
Row 24: cast off remaining stitches

Cherry on the top:
Cast on 4 in red yarn
knit 1 row
(P2tog) twice, pass 1st stitch over the second and pull end through to secure.

alternatively you could use a fabric flower instead of the cherry or cut a small circle of red felt.

To Finish:
Sew cherry on to top. Sew in ends neatly on reverse. Sew on beads / sequins and attach to T-shirt / tea cosy / greeting card etc...

Tshirtcupcake_2


Cupcake_card

Copyright © Julie Williams 2006.


knitted flower pattern

Flower

Can be used singley as a decoration on clothing and accessories or grouped to make a posy and sewn onto a hairband or hairslide. Knitting it in green will give you a shamrock / lucky clover. I’m sure there are lots of other uses too.

Materials: Using 2.25mm (USA size 1, UK/Canadian size 13) needles and 4 ply yarn

Pattern:

cast on 5 stitches
row 1: **slip 1, knit 3. turn leaving remaining stitch unworked
row 2: purl 3, turn leaving remaining stitch unworked
row 3: knit 3, turn leaving remaining stitch unworked
row 4: purl 3, turn leaving remaining stitch unworked
row 5: knit 4
row 6: purl 2 together, purl 1, purl 2 together (3 stitches)
row 7: knit 1, knit 2 together and pass first stitch over to give 1 stitch on needle
Use this stitch to cast on 4 more stitches (5 in total) and repeat from ** to give desired number of petals (3, 4 or 5)

If you'd like a larger flower then simply cast on 7 stitches and follow the same principle of working only on the centre 5 stitches for the first 6 rows and then decreasing by knitting 2 stitches together at both ends of the following rows until you have a single stitch again. Repeat for the desired number of petals.

To finish:
thread end through last remaining stitch and then gather up the middle of the flower by catching up  2 stitches the from base of each ‘petal’, pulling up tight and tying off the ends.

Attach to article and sew a contrasting french knot / button / felt circle in the centre of flower.

Working on the middle stitches only gives the ‘petal’ a natural curl. Once the flower is finished you can choose to curl petals up or down.


405654460_1923583f17_o

Copyright © Julie Williams 2006.